 Ever wondered how the glamorous design of the Aoqun was made? What is it that makes the whole set worth thousands of yuan, asides from the superior quality of the fabric? How is the top made so that it forms the body so well but remain comfortable, or how does the skirt hold itself up? Here, I will try to deliver the “secrets” right from Chinese sources.
The Aoqun 襖裙 is comprised primarily of two pieces – an Ao 襖 top, which is defined as a “top with cotton lining, and goes down to just below the waist”, followed by a Qun 裙 – or more specifically the “Horse-faced skirt” 馬面裙, with small pleates on both sides and one large “face” pleate on the front and back. The Aoqun is a commonly-seen design among mid-late Ming relics from wealthy families and the royal court, as part of the casual or semi-formal fall-winter wardrobe. Currently, unlined versions of the Aoqun are also produced for the market – although technically “Ruqun”, they are still labelled Aoqun for noting its iconic Ming conical cutting, and the top worn untucked to the skirt.
Although some argue that the Aoqun gives the woman an older image, real life examples show that with the right colour and material, this design can give just as a youthful image as any other Hanfu design.
Part I: The Ao
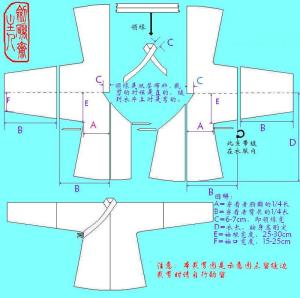
The construction of all Hanfu tops are largely common to each other. It is comprised of 4 main pieces of fabric, along with 1 collarpiece and 2~3 pairs of small fabric sashes. In addition, a white “patch collar” may be hand-sewn on top of the collar, which can be replaced when it gets soiled.
The total arm stretch length (fingertip to fingertip) is to be measured, and then divided into four equal parts, which will translate to the widths of the four main pieces of fabric for the body and sleeves (length B in diagram). The entire workings of sketching and cutting will be done while the fabric is folded in half to ensure complete symmetry.
-
The body pieces: measure down from the shoulder line about 9~10 inches and mark the distance as the sleeve width at the root. Regardless of sleeve width, this end should give generous space to ensure freedom of movement (Measurement E). From the lower end of E, measure out the distance equivalent of 1/4 of the wearer’s bust measurement (Measurement A). Slightly loose measurements may help. Measure out the lenth of the piece as well by applying shoulder-hip length to this piece (Measurement D).
-
The sleeve pieces: With the same fabric folded in half as previous, simply draw out the sleeve as desired, with the “shoulder-line” fold as one end of the sleeve. While sketching, make sure it remains symmetrical along the meridian.
- The lapel pieces: Make sure the angle is the same as that of the cut-out from the body piece, and extends to just a little more than measurement A in width.
- The collar piece: Prepare a long strip of fabric (there should be space after you have finished sketching the lapel piece) about 16~20cm wide, and about 120cm long (usually the entire length of your fabric, both sides). Fold it widthwise in half, and fold in the angles at the end.
- Sashes: Use scraps left over from the main parts (e.g. the leftovers from the underarms should be plenty) to create 6 sashes, about 20cm in length, and as wide or narrow as you wish (although they are best left unnoticeable). Be careful when sewing on the sashes: the left armpit one is always on the inside, and the right armpit one is always outside.
The completed sketch on one continuous piece of fabric should look something like this (below):

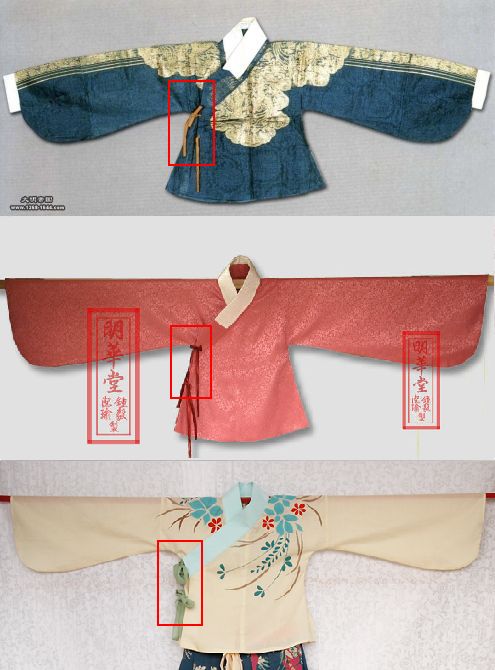
A comparison of historical, well made, and not-so-well made Ao's. Notice the contours at the armpit.
Part II: The Skirt
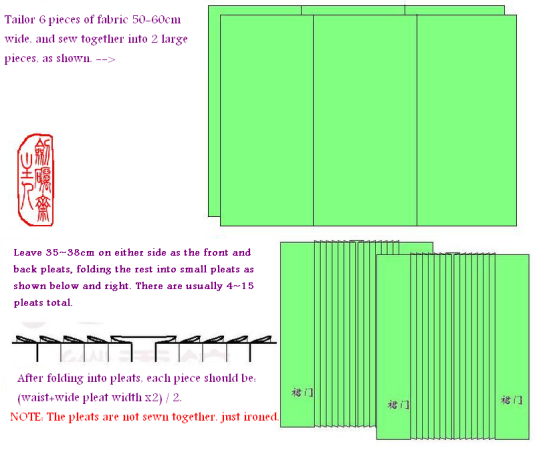
The “horse-face skirt” Mamianqun is one of the more complex designs of skirts in Hanfu, and requires a bit more work than other designs. However, by following these procedures carefully with a little tailor’s finesse, it should come out beautifully.
Credits: Kudos to Ganling 甘領 of Hanfu Baidu Bar 百度漢服吧 for the excellent drawings on the Ao and Mamianqun.
EDIT: Ganling (as well as the author) has pointed out that conventions for making the skirt head sashes has always kept them separate, without going through the skirt head. Here is an alternate/revised edition below. Note that each of the new (separated) sashes are sewn on the ends of the skirt, at 0.5x waist circumfrence.


Jan 31, 2010 @ 08:33:35
Are you going to attempt it? Trying to get a good fabric on par with MHT standards for the skirt would be tricky…
Jan 31, 2010 @ 11:26:47
Why would you need to? A simple black fabric with a little silver hem pattern, and you’d have a skirt that’d fit any occasion!
Or, get some fabric with alternate color stripes…or, fading transition colors…or…
The Chinese have lost this technology, now…
Silk that can change colour according to the angle of light source, causing rolling colour changes as one walks. NOW THAT’S something worth dying for.
Feb 28, 2010 @ 08:35:10
You mean shot silk taffeta? That is easily obtainable. I have a few sources.
Feb 16, 2010 @ 20:23:42
I am making my pattern right now.
If you want something that gives the rolling color changes, I would suggest Thai silk. It’s weaved like a broadcloth, with different colored threads running in the two directions. It’s a little tricky to find, but it’s really perfect for this usage and easy to work with.
Feb 16, 2010 @ 23:28:44
Glad to hear that you’re attempting it! One common problem with the Yi/Ao top though is the armpit versus collar opening – be sure to measure generously, while opening JUST ENOUGH (not too much, not too little) for a nice fit around the neck – too much, and the whole thing flops. Too little, and the meridians move to the side.
Mar 08, 2010 @ 03:40:53
Alright, I made my mock-up with the cheap fabric. Luckily, the collar turned out well-placed. I notice that the allowance for the chest measurement is pretty small – maybe 2″ more than the actual measurement – to get the best fit. Even with such a close fitting, it is very comfortable and affords good movement, in part because the sleeve width is generous.
(I mention all this for any other prospective aoqun makers out there ^__^)
Mar 08, 2010 @ 11:55:37
pondmud:
I have received this advice from a Chinese maker:
For every layer outside you are making, add another 2 to 4″ on the chest measurement. This adjusts for the additional size from every layer worn inside. Just a small bit of obviousness that I didn’t notice until she told me.
Nov 01, 2012 @ 20:17:09
A question about layering:
You mentioned that additional room (2-4 inches) needs to be added to the chest measurement for each layer as you move outward, and the diagrams in the black picture show the vest being 2 inches wider in the arm opening than the outermost layer that it goes on top of.
If there are 2 layers, both with sleeves, should a similar amount (2 inches) be added to the sleeve width (near the armpit) for each layer as you move outward, or would less additional width (1 inch) be enough to make the layers fit nicely?
(So, inner layer: 9 inches, second layer:11 inches, vest: 13 inches, or could the difference between the inner layer and the second layer be smaller?)
In the examples, I gave, I was actually listing the width if cut on fold like it shows in the black diagram (so, 18 inches for inner layer, 22 inches for second layer, 26 inches for vest).
Nov 01, 2012 @ 22:57:12
Hi;
Good question, never tried that myself, although I do have some concerns:
The more layers you have, the more room it takes for each layer to move and layer inside the outer layer as you move. Hence, I wonder if decreasing the difference with each outer layer would actually hinder the flow of the clothing as you move andd turn. But, do try that out, would you?
Mar 16, 2010 @ 10:00:53
DID IT.
I only have a few finishing details to add in, including the white collar, but it’s complete enough for me to have tried it on and to say it is one of the most comfortable beautiful things to wear. Functionality is one of my favorite things about clothes, and this has it.
Mar 16, 2010 @ 10:01:22
er…
http://i109.photobucket.com/albums/n60/pondmud/jpg.jpg?t=1268751497
Mar 16, 2010 @ 12:29:28
Beautiful!
(For those who don’t know, the collar is in the ‘wrong’ direction due to mirror shot)
I can’t help but notice that the armpit spot could use JUST a little more room. O’er than that…
I’d be curious how much you spent on making this set. If there are any particular designs you wish to know the pattern, tell me and I’ll write up a guide to it, or you could venture off to the Chinese forums for that…
Mar 16, 2010 @ 18:51:15
Thank you! ^__^
Oh, but yes, my dressform dummy is fuller figured than I am LOL so yes, if it looks a little tight, that is true. My arms aren’t as built as hers XD so when I wear it, the fit is correct.
I ended up buying a polyester shantung fabric because I couldn’t find silk (the silk I liked was over $50/yard, and that was far more than my budget could allow!) I think the materials plus thread and trim didn’t run more than $50.
These were my observations in sewing aoqun:
If your fabric width is 60″, then there is no practical need to divide each panel of your mamian qun into three. This is enough fabric for up to 35″ hips like mine. You can simply mark off where you want to pleats to begin and end, and iron them in if desired. Also, the amount of fabric that gets pleated might seem excessive, but that allows you to walk very freely without exposing your legs. So if you pleat neatly and pick a good fabric that isn’t too stiff, it will fall nicely.
I tried the waistband both ways, and went with the revised/alternate method. I also added a stiff interfacing to the waistband, and the reason is so that it would lie neat and flat, rather than crumpling down. Thus it gives me the option of wearing with the ao tucked in.
When it comes to the ao, note the curving bottom hem of the historical and better-made photos. Sewing it straight across as in the lower-quality ao will result in an uglier drape around your body, and you’ll also end up with the bottom corners poking out. That’s because you are not two-dimensional ;). I sewed it straight across at first, this is how I know! There is a purpose to the curved design. It may be a little trickier to sew, but you will be so much happier with the results. It’s way more graceful a shape than straight down, when you consider the flare of the qun.
The one question I have is about the tie for the qun: how exactly is it tied? I can’t think of a neat way to do it without adding a slit in the waistband for the ribbon to pass through.
*whew* long post…. I really hope you guys have a lot of fun at the hanfu making event. I wish I lived closer.
Apr 05, 2010 @ 02:13:15
April 4 update: The design I drew up in the middle of the post has been changed, since someone at the workshop has pointed out an elementary mistake: You can’t simply rotate a pattern 90° out of pattern and fabric tension concerns…
Hence, I have completely redrawn the pattern, the traditional way. If one wants to make a longer robe, the logic is to extend the top to a much longer length. I may write up a tutorial on the Zhiduo (male long robe) next, but I am still having some difficulty understanding how the inside panels work. I am getting an actual one made in China and it should arrive soon. I will do my best to study it and re-explain it soon.
Re: Mamian Qun. The divide into three is a way to keep track of the distance, as well a tip-of-the-hat to the traditional rule of cloth width limitations. Not only the Mamian qun, but regular non-pleated hanfu (non-formal/ritual) skirts are always six panels, hence the saying “one skirt dragging along six panels of the Xiang River’s tides” (一帶六幅湘江水).
Apr 09, 2023 @ 20:05:37
I think the real reason the skirt is made with 3 panels is because historically silk used to be woven in much smaller widths than today.
And it used to be about 60cm
Oct 06, 2012 @ 07:48:39
Hi – I’m helping write a live action roleplaying scenario set in historical China. May we reference this (excellent) guide in the player handouts?
Oct 06, 2012 @ 10:17:29
If you find my messy chickenscratch to be of use, then please go right ahead. Thanks for the heads-up!
Feb 04, 2020 @ 13:44:58
Reblogged this on Amber pools in Dark woods.
Aug 18, 2021 @ 15:14:06
Many thanks for the detailed instructions, I have come up with an additional question concerning the skirt piece: was it hemmed? Cause it seems that this info was missed (either by me or by the author ))